如何在 Python 中使用 tkinter 构建一个简单的 GUI 计算器
简介
在 Python 中,我们使用 tkinter 库 来创建 GUI 组件并制作更好的用户界面。
在本文中,您将学习构建一个简单的基于 GUI 的计算器应用程序的方法。
入门
在开始之前,我们需要先整理一些事情。
首先让我们下载 Python 的图像库,我们将使用它从本地系统获取图像。要安装 PIL(Pillow),请启动您的终端并输入以下命令。
pip install Pillow
现在您已经安装了该软件包。您必须下载计算器所需的图标。
您可以访问 Google 图片并下载所需的图标。但是,如果您想要我为这个项目使用的同一套图标,您可以从 − 下载它。
https://www.dropbox.com/sh/0zqd6zd9b8asmor/AAC3d2iOvMRl8INkbCuMUo_ya?dl=0.
确保将所有图标下载到名为"asset"的文件夹中。
接下来,我们需要导入所需的模块。
from tkinter import *
from PIL import Image # pip install Pillow
from PIL import ImageTk
就是这样。现在您必须已设置好一切并准备开始。
创建函数
首先,我们必须创建 GUI 组件将使用的函数。
有三个主要函数,一个是按下数字或符号时,另一个是按下等于按钮时,最后是按下清除按钮时。
让我们首先初始化几个全局变量 −
txt = ""
res = False
ans = 0
示例
按下按键数时的函数 −
def press(num):
   global txt, ans, res
   if (res==True):
      txt = ans
      res = False
   txt = txt + str(num)
   equation.set(txt)
示例1
按下等于按钮时的功能−
def equal():
   try:
      global txt, ans, res
      ans = str(eval(txt))
      equation.set(ans)
      res = True
   except:
      equation.set("ERROR : Invalid Equation")
      txt=""
按下清除按钮时的函数 −
示例
def clear():
   global txt, ans, res
   txt = ""
   equation.set("")
   res = False
现在我们已经定义了函数,我们可以启动主函数并开始处理 GUI 组件。
if __name__ == "__main__":
   window = Tk()
   window.configure(background="black")
   window.title("Calculator")
   window.iconbitmap("assets\Calculator\Logo.ico")
   window.geometry("343x417")
   window.resizable(0,0)
上述代码行将构建一个完美的计算器。
注意 − 为了避免出现错误,请确保遵循与上述代码完全相同的文件结构。将徽标图标保存在 assets 文件夹内的 Calculator 文件夹中。
遵循以下格式 −
+---Working Directory
   +---Calculator.py
   +---assets
      +---Calculator
         +---All the icons.
接下来,让我们设计一个文本字段,我们将在其中看到数字。
equation = StringVar()

txt_field = Entry(relief=RIDGE,textvariable=equation,bd=10,font=("Aerial",20),bg="powder blue")

txt_field.grid(columnspan=4,ipady=10,ipadx=10,sticky="nsew")
现在,我们将按照重复的步骤,逐个将图标添加到 GUI 窗口。下面是其中的一个例子,您可以按照它进行其余操作,也可以从本文末尾的完整代码中复制。
示例
width=80
height=80
img1 = Image.open("assets/Calculator/one.PNG")
img1 = img1.resize((width,height))
oneImage = ImageTk.PhotoImage(img1)
button1 = Button(window, image=oneImage,bg="white",command = lambda:press(1),height=height,width=width)
button1.grid(row=2,column=0,sticky="nsew")
与上面的代码行类似,按照 button2、button3 等操作,直到覆盖所有数字和符号。
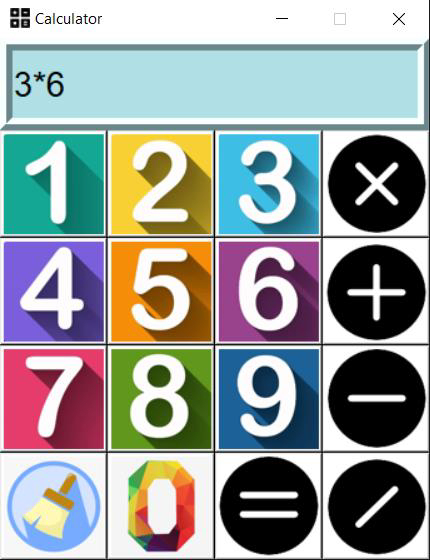
就这样了。它。如果你现在运行该程序,你会看到一个非常抽象的计算器。
如果你无法跟进,你可以从下面获取完整的代码。
示例
from tkinter import *
from PIL import Image
from PIL import ImageTk

txt = ""
res = False
ans = 0

def press(num):
   global txt, ans, res
   if (res==True):
      txt = ans
      res = False
   txt = txt + str(num)
   equation.set(txt)
def equal():
   try:
      global txt, ans, res
      ans = str(eval(txt))
      equation.set(ans)
      res = True
   except:
      equation.set("ERROR : Invalid Equation")
      txt=""
def clear():
   global txt, ans, res
   txt = ""
   equation.set("")
   res = False
if __name__ == "__main__":
   window = Tk()
   window.configure(background="black")
   window.title("Calculator")
   window.iconbitmap("assets\Calculator\Logo.ico")
   window.geometry("343x417")
   window.resizable(0,0)
   equation = StringVar()
   txt_field = Entry(relief=RIDGE,textvariable=equation,bd=10,font=("Aerial",20),bg="powder blue")
   txt_field.grid(columnspan=4,ipady=10,ipadx=10,sticky="nsew")
   width=80
   height=80
   img1 = Image.open("assets/Calculator/one.PNG")
   img1 = img1.resize((width,height))
   oneImage = ImageTk.PhotoImage(img1)
   button1 = Button(window, image=oneImage,bg="white",command =          lambda:press(1),height=height,width=width)
   button1.grid(row=2,column=0,sticky="nsew")
   img2 = Image.open("assets/Calculator/two.PNG")
   img2 = img2.resize((width,height))
   twoImage = ImageTk.PhotoImage(img2)
   button2 = Button(window, image=twoImage,bg="white",command =    lambda:press(2),height=height,width=width)
   button2.grid(row=2,column=1,sticky="nsew")
   img3 = Image.open("assets/Calculator/three.PNG")
   img3 = img3.resize((width,height))
   threeImage = ImageTk.PhotoImage(img3)
   button3 = Button(window, image=threeImage,bg="white",command =    lambda:press(3),height=height,width=width)
   button3.grid(row=2,column=2,sticky="nsew")
   img4 = Image.open("assets/Calculator/four.PNG")
   img4 = img4.resize((width,height))
   fourImage = ImageTk.PhotoImage(img4)
   button4 = Button(window, image=fourImage,bg="white",command =    lambda:press(4),height=height,width=width)
   button4.grid(row=3,column=0,sticky="nsew")
   img5 = Image.open("assets/Calculator/five.PNG")
   img5 = img5.resize((width,height))
   fiveImage = ImageTk.PhotoImage(img5)
   button5 = Button(window, image=fiveImage,bg="white",command =    lambda:press(5),height=height,width=width)
   button5.grid(row=3,column=1,sticky="nsew")
   img6 = Image.open("assets/Calculator/six.PNG")
   img6 = img6.resize((width,height))
   sixImage = ImageTk.PhotoImage(img6)
   button6 = Button(window, image=sixImage,bg="white",command =    lambda:press(6),height=height,width=width)
   button6.grid(row=3,column=2,sticky="nsew")
   img7 = Image.open("assets/Calculator/seven.PNG")
   img7 = img7.resize((width,height))
   sevenImage = ImageTk.PhotoImage(img7)
   button7 = Button(window, image=sevenImage,bg="white",command =    lambda:press(7),height=height,width=width)
   button7.grid(row=4,column=0,sticky="nsew")
   img8 = Image.open("assets/Calculator/eight.PNG")
   img8 = img8.resize((width,height))
   eightImage = ImageTk.PhotoImage(img8)
   button8 = Button(window, image=eightImage,bg="white",command =    lambda:press(8),height=height,width=width)
   button8.grid(row=4,column=1,sticky="nsew")
   img9 = Image.open("assets/Calculator/nine.PNG")
   img9 = img9.resize((width,height))
   nineImage = ImageTk.PhotoImage(img9)
   button9 = Button(window, image=nineImage,bg="white",command =    lambda:press(9),height=height,width=width)
   button9.grid(row=4,column=2,sticky="nsew")
   img0 = Image.open("assets/Calculator/zero.PNG")
   img0 = img0.resize((width,height))
   zeroImage = ImageTk.PhotoImage(img0)
   button0 = Button(window, image=zeroImage,bg="white",command =    lambda:press(0),height=height,width=width)
   button0.grid(row=5,column=1,sticky="nsew")
   imgx = Image.open("assets/Calculator/multiply.PNG")
   imgx = imgx.resize((width,height))
   multiplyImage = ImageTk.PhotoImage(imgx)
   buttonx = Button(window, image=multiplyImage,bg="white",command =    lambda:press("*"),height=height,width=width)
   buttonx.grid(row=2,column=3,sticky="nsew")
   imgadd = Image.open("assets/Calculator/add.PNG")
   imgadd = imgadd.resize((width,height))
   addImage = ImageTk.PhotoImage(imgadd)
   buttonadd = Button(window, image=addImage,bg="white",command =    lambda:press("+"),height=height,width=width)
   buttonadd.grid(row=3,column=3,sticky="nsew")
   imgdiv = Image.open("assets/Calculator/divide.PNG")
   imgdiv = imgdiv.resize((width,height))
   divImage = ImageTk.PhotoImage(imgdiv)
   buttondiv = Button(window, image=divImage,bg="white",command =    lambda:press("/"),height=height,width=width)
   buttondiv.grid(row=5,column=3,sticky="nsew")
   imgsub = Image.open("assets/Calculator/subtract.PNG")
   imgsub = imgsub.resize((width,height))
   subImage = ImageTk.PhotoImage(imgsub)
   buttonsub = Button(window, image=subImage,bg="white",command = lambda:press("-   "),height=height,width=width)
   buttonsub.grid(row=4,column=3,sticky="nsew")
   imgeq = Image.open("assets/Calculator/equal.PNG")
   imgeq = imgeq.resize((width,height))
   eqImage = ImageTk.PhotoImage(imgeq)
   buttoneq = Button(window, image=eqImage,bg="white",command = equal,height=height,width=width)
   buttoneq.grid(row=5,column=2,sticky="nsew")
   imgclear = Image.open("assets/Calculator/clear.PNG")
   imgclear = imgclear.resize((width,height))
   clearImage = ImageTk.PhotoImage(imgclear)
   buttonclear = Button(window, image=clearImage,bg="white",command =    clear,height=height,width=width)
buttonclear.grid(row=5,column=0,sticky="nsew")

window.mainloop()
如果您在使用上述程序时遇到格式问题,您也可以从 https://github.com/SVijayB/PyHub/blob/master/Graphics/Simple%20Calculator.py 获取它。
输出