如何在 OpenCV Python 中检测和绘制 FAST 特征点?
FAST(来自加速段测试的特征)是一种高速角点检测算法。我们使用 FAST 算法来检测图像中的特征。我们首先使用 cv2.FastFeatureDetector_create() 创建一个 FAST 对象。然后使用 fast.detect() 检测特征点,其中 fast 是创建的 FAST 对象。要绘制特征点,我们使用 cv2.drawKeypoints()。
步骤
要使用 FAST 特征检测器检测并绘制输入图像中的特征点,您可以按照以下步骤操作
导入所需的库 OpenCV 和 NumPy。确保您已经安装了它们。
使用 cv2.imread() 方法读取输入图像。指定图像的完整路径。使用 cv2.cvtColor() 方法将输入图像转换为灰度图像。
使用默认值 fast=cv2.FastFeatureDetector_create() 启动 FAST 对象。您可以选择使用 fast.setNonmaxSuppression(0) 将非最大抑制设置为 False。
检测灰度图像中的特征点。使用 fast.detect(gray, None)。它返回关键点 kp。
在图像 cv2.drawKeypoints() 函数上绘制检测到的关键点 kp。
显示已绘制关键点的图像。
让我们看看使用 FAST 特征检测器检测和绘制输入图像中特征点的示例。
输入图像
我们将在下面的示例中使用以下图像作为输入文件。

示例
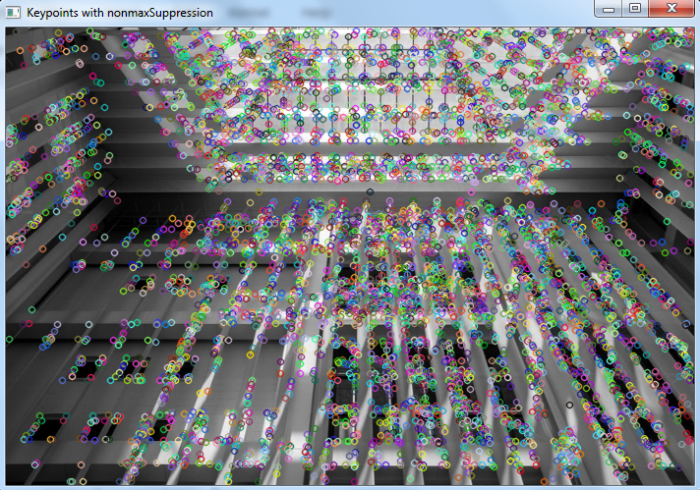
在此程序中,我们使用 FAST 算法检测和绘制特征点。默认的 nonmaxSuppression 设置为 True。
# import required libraries
import cv2

# read input image
img = cv2.imread('architecture.jpg')

# convert the image to grayscale
gray = cv2.cvtColor(img, cv2.COLOR_BGR2GRAY)

# Initiate FAST object with default values
fast = cv2.FastFeatureDetector_create()

# find the keypoints on image (grayscale)
kp = fast.detect(gray,None)

# draw keypoints in image
img2 = cv2.drawKeypoints(img, kp, None)

# Print all default params
print("Threshold: ", fast.getThreshold())
print("nonmaxSuppression: ", fast.getNonmaxSuppression())
print("neighborhood: ", fast.getType())
print("Total Keypoints with nonmaxSuppression: ", len(kp))

# display the image with keypoints drawn on it
cv2.imshow("Keypoints with nonmaxSuppression", img2)
cv2.waitKey(0)
cv2.destroyAllWindows()
输出
执行时,它将产生以下输出 −
Threshold: 10
nonmaxSuppression: True
neighborhood: 2
Total Keypoints with nonmaxSuppression: 5791
我们得到以下窗口,显示带有绘制关键点的图像 −
示例
在此程序中,我们使用 FAST 算法检测和绘制特征点。我们将 nonmaxSuppression 设置为 False。
# import required libraries
import cv2

# read input image
img = cv2.imread('architecture.jpg')

# convert the image to grayscale
gray = cv2.cvtColor(img, cv2.COLOR_BGR2GRAY)

# Initiate FAST object with default values
fast = cv2.FastFeatureDetector_create()

# Disable nonmaxSuppression
fast.setNonmaxSuppression(0)

# find the keypoints on image (grayscale)
kp = fast.detect(gray,None)

# Print all default params
print("Threshold: ", fast.getThreshold())
print("nonmaxSuppression: ", fast.getNonmaxSuppression())
print("neighborhood: ", fast.getType())
print("Total Keypoints without nonmaxSuppression: ", len(kp))
img2 = img.copy()
img2 = cv2.drawKeypoints(img2, kp, None)

# display the image with keypoints drawn on it
cv2.imshow('Keypoints without nonmaxSuppression',img2)
cv2.waitKey(0)
cv2.destroyAllWindows()
输出
执行时,它将产生以下输出:
Threshold: 10
nonmaxSuppression: False
neighborhood: 2
Total Keypoints without nonmaxSuppression: 27101
我们得到以下窗口,显示其上绘制了关键点的图像−
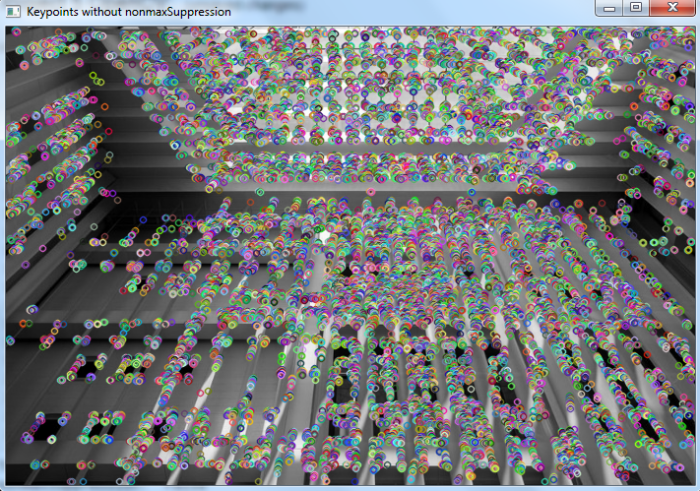
我们注意到,当nonmaxSuppression为False时,检测到的关键点总数比nonmaxSuppression为True时更多。