如何在 Android 中实现可塑性 ImageView?
可塑性 ImageView 是 Android Material Design 库中一项有影响力的功能,它允许应用程序开发人员创建个性化且形状独特的图像视图。
Android 中的可塑性 ImageView 为开发人员提供了一种简单直观的方法,可以将各种形状应用于图像视图,包括圆形和圆角矩形。只需遵循几个简单的步骤,就可以轻松增强其应用程序的视觉吸引力。
开发人员可以使用可塑性 Image-View 轻松创建视觉上令人愉悦的用户界面,从而增强用户体验。本教程将指导您在 Android 应用程序中实现可塑性 ImageView。
ImageView
ImageView 组件是许多 Android 应用程序的重要组成部分。它属于 View 类,可以在应用程序的用户界面中无缝呈现图像,具有令人印象深刻的效率。除了其主要功能外,ImageView 还提供各种特性和功能,可帮助操纵图像以进行显示。
开发人员可以轻松使用 ImageView 工具从各种来源(例如本地资源、网络 URL 或生成的位图对象)加载图像。ImageView 的内置缩放和调整大小选项可在图像的边界内无缝调整图像。此外,还提供旋转、裁剪和 alpha 混合等转换,以方便开发人员使用。这个功能丰富的工具支持不同的格式,例如 JPEG、PNG、GIF 和 WebP。
Android 应用中的 ImageView 用途非常广泛。开发人员可以使用属性和方法来调整其外观,以操纵从图像大小到背景、滤镜甚至点击效果的所有内容。如果您希望您的应用图像看起来令人惊叹并且对用户具有交互性,那么掌握这个组件是必须的。
方法
要在 Android 中实现可塑性 ImageView,您可以使用不同的方法。以下是三种常见方法:
XML 布局方法
编程方法
样式方法
XML 布局方法
在此方法中,您在 XML 布局文件中定义一个 ShapeableImageView 元素,并使用 app:shapeAppearanceOverlay 属性指定所需的形状外观。这允许您直接在 XML 中轻松配置形状和其他属性,从而提供一种实现 Shapeable ImageView 的声明式方法。
算法
在您的 XML 布局文件中声明一个 ShapeableImageView 元素。
使用 app:shapeAppearanceOverlay 属性指定所需的形状外观。
根据需要自定义其他属性。
示例
//activity_main.xml
<?xml version="1.0" encoding="utf-8"?>
<RelativeLayout
xmlns:android="http://schemas.android.com/apk/res/android"
   xmlns:app="http://schemas.android.com/apk/res-auto"
   xmlns:tools="http://schemas.android.com/tools"
   android:layout_width="match_parent"
   android:layout_height="match_parent"
   tools:context=".MainActivity">

   <com.google.android.material.imageview.ShapeableImageView
      android:id="@+id/shapeableImageView"
      android:layout_width="200dp"
      android:layout_height="200dp"

app:shapeAppearanceOverlay="@style/ShapeAppearanceOverlay.App.Corner
Size"
      android:src="@drawable/your_image" />

</RelativeLayout>

// styles.xml
<style name="ShapeAppearanceOverlay.App.CornerSize">
   <item name="cornerSize">16dp</item> <!-- Customize the
corner
size as per your requirement -->
</style>

// MainActivity.java
import android.os.Bundle;
import androidx.appcompat.app.AppCompatActivity;
import com.google.android.material.imageview.ShapeableImageView;

public class MainActivity extends AppCompatActivity {

   @Override
   protected void onCreate(Bundle savedInstanceState) {
      super.onCreate(savedInstanceState);
      setContentView(R.layout.activity_main);

      ShapeableImageView shapeableImageView = findViewById(R.id.
shapeableImageView);
      // You can further customize the ImageView here if needed
   }
}
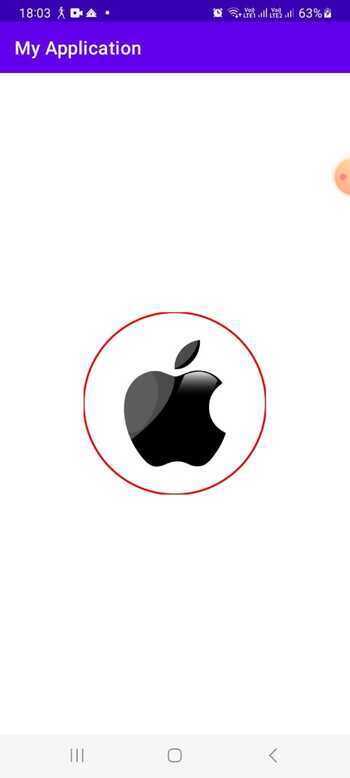
输出
编程方法
使用编程方法,您可以使用构造函数在 Java 代码中创建 ShapeableImageView 的实例。然后,您可以使用 setShapeAppearanceModel() 方法设置形状外观,从而允许您动态定义形状并以编程方式自定义其他属性。当您需要在运行时应用不同的形状或修改形状外观时,此方法非常有用。
算法
在 Java 代码中创建 ShapeableImageView 的实例。
使用 setShapeAppearanceModel() 方法设置形状外观。
以编程方式自定义其他属性。
示例
// MainActivity.java
import android.os.Bundle;
import android.widget.LinearLayout;

import androidx.appcompat.app.AppCompatActivity;

import com.google.android.material.imageview.ShapeableImageView;
import com.google.android.material.shape.CornerFamily;
import com.google.android.material.shape.ShapeAppearanceModel;

public class MainActivity extends AppCompatActivity {

   @Override
   protected void onCreate(Bundle savedInstanceState) {
        super.onCreate(savedInstanceState);
        setContentView(R.layout.activity_main);

        LinearLayout parentLayout = findViewById(R.id.parent_layout);

        // 创建 ShapeableImageView 实例
        ShapeableImageView shapeableImageView = new ShapeableImageView(this);

        // 创建带圆角的 ShapeAppearanceModel
        ShapeAppearanceModel shapeAppearanceModel = new ShapeAppearanceModel()
        .toBuilder()
        .setAllCorners(CornerFamily.ROUNDED, 20) // 设置圆角半径
        .build();

        // 将 ShapeAppearanceModel 设置为 ShapeableImageView

        shapeableImageView.setShapeAppearanceModel(shapeAppearanceModel);

        // 设置图像资源
        shapeableImageView.setImageResource(R.drawable.my_image);

        // 将 ShapeableImageView 添加到父布局
        parentLayout.addView(shapeableImageView);
   }
}

//activity_main.xml
<!-- activity_main.xml -->
<LinearLayout
xmlns:android="http://schemas.android.com/apk/res/android"
   xmlns:tools="http://schemas.android.com/tools"
   android:id="@+id/parent_layout"
   android:layout_width="match_parent"
   android:layout_height="match_parent"
   android:orientation="vertical"
   android:gravity="center"
   android:padding="16dp"
   tools:context=".MainActivity">

   <!-- Add other views or elements as needed -->

</LinearLayout>
输出

样式方法
样式方法涉及在扩展 Widget.MaterialComponents.ShapeableImageView 的 style.xml 文件中定义样式。在样式中,您可以使用 cornerFamily 和 cornerSize 属性设置所需的形状外观。通过使用 style 属性将此样式应用于 XML 布局文件中的常规 ImageView,您可以实现可塑性行为,而无需直接使用 ShapeableImageView 类。当您想要将相同的形状外观应用于多个 ImageView 或希望在样式而不是单个 XML 元素中定义外观时,此方法非常适用。
算法
在扩展 Widget.MaterialComponents.ShapeableImageView 的 style.xml 文件中定义样式。
使用 cornerFamily 和 cornerSize 属性设置所需的形状外观。
使用 style 属性将样式应用于 XML 布局文件中的常规 ImageView。
示例
styles.xml

<?xml version="1.0" encoding="utf-8"?>
<resources>
   <style name="ShapeableImageViewStyle"
parent="Widget.MaterialComponents.ShapeableImageView">
      <item name="shapeAppearanceOverlay">
@style/ShapeAppearanceOverlay.MyApp.Image</item>
   </style>

   <style name="ShapeAppearanceOverlay.MyApp.Image" parent="">
      <!-- Define the shape appearance properties here -->
      <item name="cornerFamily">rounded</item>
      <item name="cornerSize">16dp</item>
   </style>
</resources>

activity_main.xml

<com.google.android.material.imageview.ShapeableImageView
   android:id="@+id/shapeableImageView"
   style="@style/ShapeableImageViewStyle"
   android:layout_width="200dp"
   android:layout_height="200dp"
   android:src="@drawable/my_image"
   app:layout_constraintTop_toTopOf="parent"
   app:layout_constraintStart_toStartOf="parent"
   app:layout_constraintEnd_toEndOf="parent"
   app:layout_constraintBottom_toBottomOf="parent" />

MainActivity.java
import android.os.Bundle;

import androidx.appcompat.app.AppCompatActivity;

import com.google.android.material.imageview.ShapeableImageView;

public class MainActivity extends AppCompatActivity {

   @Override
   protected void onCreate(Bundle savedInstanceState) {
      super.onCreate(savedInstanceState);
      setContentView(R.layout.activity_main);

      ShapeableImageView shapeableImageView =
findViewById(R.id.shapeableImageView);
      shapeableImageView.setImageResource(R.drawable.my_image);
   }
}
输出

结论
在本教程中,在 Android 中实现可塑性 ImageView 提供了多种方法来自定义图像视图的形状外观。无论是通过 XML 布局、以 Java 编程方式还是使用样式,开发人员都可以通过向图像视图应用不同的形状轻松实现视觉吸引力强且具有交互性的用户界面。这种灵活性增强了 Android 应用程序的整体设计和用户体验。